DBC Network
Showing posts with label ubuntu. Show all posts

Monday, 21 June 2010

How To Configure Bluetooth Modem in Ubuntu

Using GSM/3G USB modems in Ubuntu is pretty straightforward (as long the devices are recognized by Ubuntu) just plug in and then set username, password and APN and sometimes custom DNS servers and you're good to go.

But that's not the case with bluetooth modems especially CDMA, since you must enter the so-called "extra initialization command" e.g. : at+crm=1 and there's nowhere to put it in Network Manager. Even before that you must type lines of command just to detect your bluetooth modem. In the past I must opened the Terminal and the not so user-friendly wvdial.
But that in the past now. Thanks to Blueman + Network Manager + Configuration Editor (command : gconf-editor).
If you have bluetooth devices Blueman will be your best friend. Get the latest stable version from its PPA by adding this line in your repository :

http://ppa.launchpad.net/blueman/ppa/ubuntu karmic main

The latest Blueman (version 1.21 can integrate bluetooth dial-up modem into Network Manager 0.8 that will make life easier :) If you run Ubuntu 9.10 you already have Network Manager 0.8.

Note :
- CDMA USB modem, skip step #1,
- GSM Bluetooth modem, skip step #3

1. Blueman step,
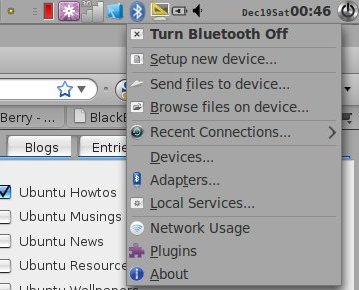
After Blueman installed, right click its icon in system tray -> Local Services.
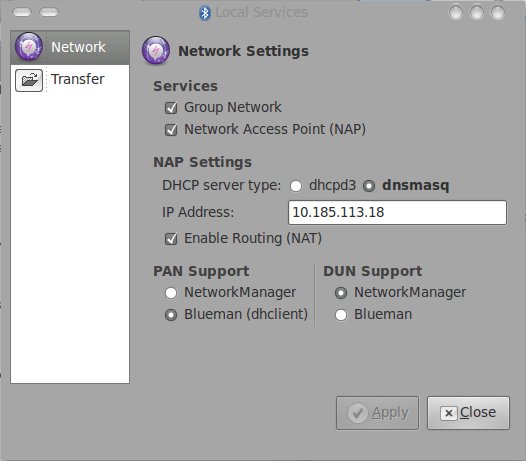
Choose Network Manager in DUN Support setting (you can ignore other setting shown in this pic).
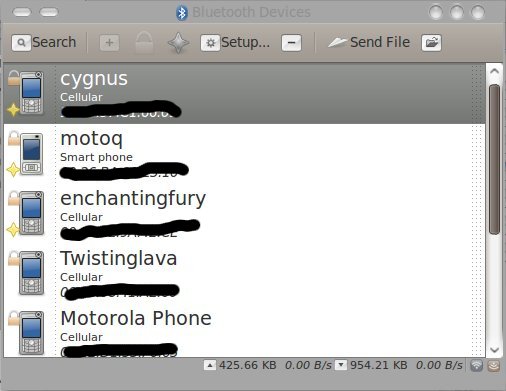
After that, use Blueman to discover your modem by right clicking the Blueman icon again -> Devices (or Setting -> Preferences -> Bluetooth Manager) and then click search. After your device is found, right click on it and click Serial Ports -> Dial Up Service, Network Manager will take the rest.
2. Network Manager step,
If you're lucky Network Manager will start connection wizard. Follow and fill. If the wizard doesn't start automatically, add the new connection via Setting -> Preferences -> Network Connections, in Mobile Broadband tab click Add just make sure to pick "Installed CDMA Device" on the first dialog fill the rest as per your ISP manual. I use CDMA connection from Smart, and I'll use this as an example:

number : #222
username : cdma
password : cdma

name it with something distinctive, click Apply to save your new connection profile. Read here to use custom DNS server.

3. Configuration Editor step,
Run it via System Tools -> Configuration Editor, and follow this steps :

  • go to system -> networking -> connections
  • there are numbers that represents your connection profiles, you can find which one by Edit -> Find and use your connection name as keyword,
  • in my case : /system/networking/connections/19/connection/id, so number 19 is my number,
  • go to /system/networking/connections/19/cdma/
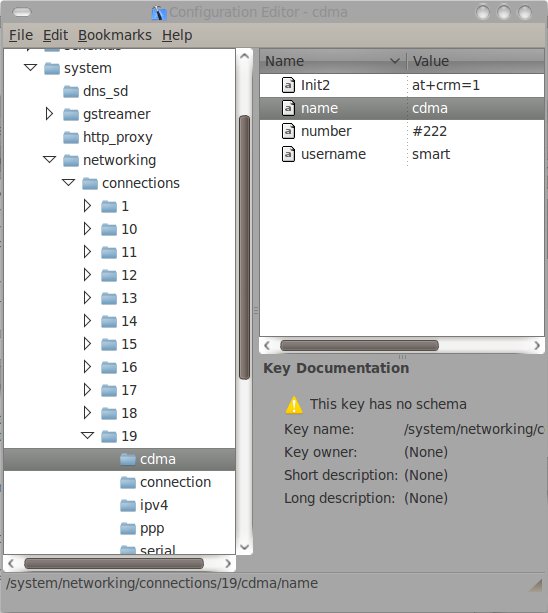
  • make a new key, right click -> New Key, with this information :
    Name : Init2
    Type : String
    Value : at+crm=1 (or as per your ISP manual)

    and the new key will appear :

  • close Configuration Editor, and start your CDMA Internet connection from Network Manager.
Hope it helps Bluetooth modem, CDMA, or ISP with extra initialization command users.

keyword : extra initialization command | cdma | ubuntu | bluetooth

Saturday, 27 February 2010

Modem connection Sony Ericsson K510i in Ubuntu Jaunty Jackalope

I began to recognize the Ubuntu LTS from 6:06-Drapper Drake, Edgy Eft 6:10, starting with (dual boot) since 7:04 and Feisty Fawn 7.10 Gutsy Gibbon, but only actually use to work since the 8.04-LTS Hardy Heron, Intrepid Ibex 8:10, and 9:04 Jaunty Jackalope (although I still like Mandriva). Only in the final releases, I would not miss the upgrade (thanks to the motivation of this accident and real assistance Riyogarta mas). Likewise, many who I did not know. Not for nothing, maybe just because my brain is too slow to follow the progress of thinking too fast. Plus, it was too long window poisoning.

When I use Hardy Heron, I started using bluetooth modem for hape reliable Internet connection (dialup). Play KPPP, Gnome PPP and wvdial getting used to. When changing Intrepid Ibex, I initially bluetooth trouble connecting via dialup modem, although soon be overcome thanks to the help Kurnia, bloggers who are also members of the River Solo KPLI. Not long to feel comfortable, come again Jaunty Jackalope. First I was confused, why is not there wvdialnya, but lived for another internet connection, enter the terminal, type sudo apt-get install wvdial, right deh! ...

Well ... recently I got a loan hape Sony Ericsson K510i. Rather lawas hell! can only gprs, not 3G. But can be used as a modem either via Bluetooth or USB cable through luggage. On Windows, connect it via cable to function after the driver install CD is in her luggage as well.

Fad, I'm content with Flash cards, then on again and the data cable from the SE K510i I tried to plug in the USB port on my laptop which already had Jaunty Jackalope. Tuiiiinggggg ...

1-sonerk510i


already been detected? There are two options that appear on the screen SE K510i, the first to transfer files, and the second phone mode. I select the phone mode. Immediately on the laptop screen appears saying Welcome ...


2-new_mobile_broadband

I try to click the network connection icon in the top panel, was actually detected and need configuration.

3-notifikasi

When I click "configure" option appears the state and providers are used. Of course I choose Indonesia, and because the cards used in the SE K510i is subscribed Flash Card Hello, I select Telkomsel as providernya.

4-new_mobile_broadband.png

5-new_mobile_broadband.png

At this point actually being able to directly connect, but I try to peek settings to click with the right network connection icon in the top panel, click again to edit connection.

6-Editing_Telkomsel.png

There are several options there, Wired, Wireless, Mobile Broadband, VPN, and DSL. Telkomsel setting in Mobile Broadband. I just adjust the username and password, all my kosongi according to the instructions I get the first time I subscribed Flash. Dialing can numbernya * 99 #, can also * 99 *** 1 #, it could APN internet, can also telkomsel.

7-notifikasi.png

And, I try to connect to the Internet with network connection click the icon - I click on Telkomsel. I do not know why there are two types of modems on the SE K510i. Later, when I check in Windows, it also had two. I use one that just might ...

8-allow_access

Ops ... clicked out there was another warning, yes of course I invite only (yahoo)

9-konak_dah

It's connect! Network connection icon is now changed to an antenna tower image. Telkomsel Connection Established ...

Yeach ... I apologize if I made too much detail. I am sure, many of sedulur sekaliyan far more understanding. However, this is what I experienced. Apparently a lot of things so easy in Linux.

Because so easy and I did not realize it (I usually take the more difficult path, with a wvdial in the terminal), I reverse-engineer the way internet connection (dialup) in the previous Ubuntu release. I use the Live CD / Installer Ubuntu for 8:04, 8:10, and 9:04.

This is my observation: (funkydance)

Ubuntu Linux 8.04-LTS Hardy Heron: wvdial available, mobile broadband connection is not available.

Ubuntu Linux 8.10 Intrepid Ibex: wvdial and mobile broadband connection available.

Ubuntu Linux 9:04 Jaunty Jackalope: wvdial is not available, mobile broadband connection available.

Monday, 24 August 2009

Haier D1200P Smart Settings on Ubuntu


Tempted by the cheap modem I bought a modem Smart Haier D1200P for weapons when on the road. While in Jakarta, I tried but not succeeded because the time was mepet besides my brain capacity is also small. At that time I dicritani by Kang Andy MSE that he would buy a 3 seed if ya can guarantee the sale of modems can walk on Linux.

With great struggle tireless finally wear Smart internetan Haier D1200P in Ubuntu 8.10. Helped by finally enlightened Pradna kang on this night.

HP's bener Poor nyari signal to be hanged. Endar in front of the house while still in Purwokerto

After looking around to find there is also a guide in
http://ahmadbasuki.web.id/2009/02/internetan-dengan-smart-di-ubuntu-810/

http://dodolboks.wordpress.com/2009/02/08/setting-koneksi-internet-hp-smart-d1200p-di-ubuntu/

http://skyisgrey.org/blog/smart-haier-d1200p-koneksi-internet-via-pon-ubuntu-linux.html/

http://awangga.wordpress.com/2009/01/10/setting-koneksi-internet-smart-haier-mobile-d1200p-sebagai-modem/

0. Connect first to use Window $ without direct diskonek moved to ubuntu. (Do not see a way to eliminate this step)

1. "Going to the super user!"
Nadiah Nadiah @-desktop: ~ $ sudo su

2.
root @ Nadiah-desktop: / home / Nadiah # sudo-i

3. "Detection modem!"
root @ Nadiah-desktop: ~ # lsusb

Bus 005 Device 001: ID 0000:0000
Bus 004 Device 001: ID 0000:0000
Bus 003 Device 001: ID 0000:0000
Bus 002 Device 004: ID 15eb: 0001
Bus 002 Device 003: ID 10d6: 1100 Actions Semiconductor Co.., Ltd. MPMan MP-Ki 128 MP3 Player / Recorder
Bus 002 Device 001: ID 0000:0000
Bus 001 Device 001: ID 0000:0000

4. "Define hp!"
root @ Nadiah-desktop: ~ # sudo modprobe usbserial vendor = 0 × 15eb product = 0 × 0001

5. "Check HP! Should terdetek as ttyUSB0 and ttyUSB1 "
root @ Nadiah-desktop: ~ # dmesg

[15578.963467] usbserial_generic 2-2:1.0: generic converter detected
[15578.963618] usb 2-2: generic converter now attached to ttyUSB0
[15578.963638] usbserial_generic 2-2:1.1: generic converter detected
[15578.963707] usb 2-2: generic converter now attached to ttyUSB1
[15578.963721] usbcore: registered new interface driver usbserial_generic
[15578.963725] / build/buildd/linux-2.6.24/drivers/usb/serial/usb-serial.c: USB Serial Driver core
root @ Nadiah-desktop: ~ #

6. In order not easy diskonek
root @ Nadiah-desktop: ~ # gedit / etc / ppp / options

"Look!"

lcp-echo-failure 4

"Change the number 4 to as much as possible!"

7. "Create a dialer like this!"
root @ Nadiah-desktop: ~ # gedit / etc / wvdial.conf

[Dialer Defaults]
Phone =
Username =
Password =
New PPPD = yes
[Dialer smart]
Modem = / dev/ttyUSB0
Baud = 230,400
Init1 = atze0Q0v1
Init2 = ate0q0v1
Init3 = at
Init4 = at crm = 1; cmux = 1; cps = 33; CTA = 0
FlowControl = CRTSCTS
Phone = # 777
Username = smart
Password = smart
Ask Password = 0
Dial Command = ATDT
Stupid Mode = 1
CompuServe = 0
Idle Seconds = 300
ISDN = 0

8. "Konekan!"
root @ Nadiah-desktop: ~ # wvdial smart


Now that the sign was conn.

In order not diskonek every 50 minutes, change the configuration options ppp

$ Sudo gedit / etc / ppp / options

remove and replace the options in / etc / ppp / options to be as follows

asyncmap 0
noauth
crtscts
modem
proxyarp
noipx
persist
1000000 idle

http://solvewithit.com/2009/08/08/setting-smart-haier-d1200p-pada-ubuntu/

Internet connection in Ubuntu via bluetooth mobile

For me the internet needs nowadays is a need that can not be separated anymore, repot kalo also be looking for a free hotspot for more than a desire for ngenet vent. At this moment the Internet using a cellular provider is an alternative solution and the fastest access to internet, we do not need to provide a modem and phone line or even take care of registration at the ISP subscription.

Internet connecting experience with Ubuntu via bluetooth phone this time takes quite a long time, almost 1 week working on my utak and browsing the internet and ask a friend, thank God finally fulfilled a week too ... yuk more ...

Minor Tweaks this time I use my favorite laptop, Compaq V3837TU (built in bluetooth) dikolaborasikan with Sony Ericsson G502 for modem and IM3 as ISPnya. PC and your mobile phone is different from the one I use? GA PROBLEM! important computer and mobile phone you're using a bluetoothnya and can be used to connect to the Internet (yes Lovable ... slap!)

To use the phone as a modem we have to do some good settings on the laptop / PC or internet connection settings on the phone. Here are the steps: (assuming we have the configuration settings on the mobile Internet and browsing we can use our mobile phones)

(For those who use external bluetooth, and no application bluez-gnome) Open Terminal and type

sudo apt-get install bluez-gnome

Command is to download plus Install bluez-gnome applications. This process requires an internet connection or a DVD from the Ubuntu Repository.

(For those who already have an application bluetoothnya and bluez-gnome, go directly to this step) Enable bluetooth on the phone and then type

hcitool scan

Result:
masiqbal @ masiqbal-laptop: ~ $ hcitool scan
Scanning ...
00:22:98: D1: 57: BE G502

Hcitool scan command is to detect active Bluetooth devices in the coverage. Visible results hcitool scan command on the found bluetooth on my phone with the MAC Address 00:22:98: D1: 57: BE. After that type


sdptool search DUN

command above is to find the Dial Up Networking service on our mobile phone bluetooth. Here are the results from sdptool search command in Ubuntu DUN me:

masiqbal @ masiqbal-laptop: ~ $ sdptool search DUN
Inquiring ...
Searching for DUN on 00:22:98: D1: 57: BE ...
Service Name: Dial-up Networking
Service RecHandle: 0 × 2008003
Service Class ID List:
"Dialup Networking" (0 × 1103)
"Generic Networking" (0 × 1201)
Protocol Descriptor List:
"L2CAP" (0 × 0100)
"RFCOMM" (0 × 0003)
Channel: 1
Profile Descriptor List:
"Dialup Networking" (0 × 1103)
Version: 0 × 0101

That needs to be noted from the above command is the MAC Address 00:22:98: D1: 57: BE and channel number used. Channel number that appears on my ubuntu is 1. Tax-channel results can be different on each computer. More ...

Then proceed to edit the file rfcomm.conf located in the folder / etc / bluetooth with the command

sudo gedit / etc / bluetooth / rfcomm.conf

Here are the contents of the file rfcomm.conf mine that I have to edit the MAC Address and customize channel number from my mobile phone bluetooth as well as information "bind no" to "bind yes"

Contents rfcomm.conf files by default:
#
# RFCOMM configuration file.
#

# rfcomm0 (
# # Automatically bind the device at startup
# Bind no;
#
# # Bluetooth address of the device
# Device 00:22:98: D1: 57: BE;
#
# # RFCOMM channel for the connection
# Channel 1;
#
# # Description of the connection
# Comment "Example Bluetooth device";
#)

The contents of the file after I rfcomm.conf fox:

rfcomm0 (
bind yes;
device 00:22:98: D1: 57: BE;
channel 1;
comment "Bluetooth SE G502";
)

Okay, then we edit the wvdial.conf file located at / etc / wvdial.conf to type the command

sudo gedit / etc / wvdial.conf

The contents of wvdial.conf file by default:
[Dialer Defaults]
Init1 = ATZ
Init2 = ATQ0 V1 E1 S0 = 0 & C1 & D2 + FCLASS = 0
Init3 = AT + CGDCONT = 1, "IP", "Homepage"
Modem Type = USB Modem
ISDN = 0
New PPPD = yes
Phone = * 99 *** 1 #
Modem = / dev/ttyACM1
Username =
Password =
Baud = 460800

Note the script above, [Dialer Defaults] is used to dial / call the cellular provider, replace it "Defaults" in the name of the card you use, eg [Dialer im3].

In the fourth row, Init3 = AT + CGDCONT = 1, "IP", "Homepage", Hompage serves as the default homepage of the cellular providers, because I use im3 card, then "Hompage" I replace with "www.indosat-m3 . net ".

To-eight rows, Phone = * 99 *** 1 # as dial numbers cellular provider, to use a dial GSM mobile number * 99 *** 1 # and the CDMA mobile phone use dial number # 777.

The ninth line, Modem = / dev/ttyACM1 is the location of mobile devices we use, if your phone is connected to a computer / PC via a data cable modem and use the settings / dev/ttyACM1, but if used via bluetooth / dev/rfcomm1.

Row ten and eleven, is a username and password cellular provider, once again, my card im3, then Username = gprs settings, and Password = im3.

OK, here is a list of sets of each provider that I know:

IM3
Homepage: www.indosat-m3.net
User: gprs
Password: im3
Dial: * 99 *** 1 #

IM3 Duration
Homepage: www.indosat-m3.net
User: indosat @ duration
Password: indosat @ duration
Dial: * 99 *** 1 #

TELKOMSEL
Homepage: telkomsel
User: wap
Password: wap123
Dial: * 99 *** 1 #

TELKOMFLASH
Homepage: flash
User: [leave empty]
Password: [leave empty]
Dial: * 99 *** 1 #

XL
Homepage: www.xlgrps.net
User: xlgprs
Password: proxl
Dial: * 99 *** 1 #

MATRIX regular [APN = satelindogsm]
Homepage:
User: [leave empty]
Password: [leave empty]
Dial: * 99 *** 1 #

MATRIX broadband
Homepage: indosat3g
User: indosat
Password: indosat
Dial: * 99 *** 1 #

MENTARI
Homepage: satelindogsm
User: indosat
Password: indosat
Dial: * 99 *** 1 #

AXIS
Homepage: http://wap.axisworld.co.id
User: axis
Password: [leave empty]
Dial: * 99 *** 1 #

Fren (Mobile-8)
User: m8
Password: m8
Dial: # 777

TELKOMFLEXY
User: telkomnet @ flexi
Password: telkom
Dial: # 777

StarOne
User: starone
Password: indosat
Dial: # 777

Provider coincidence that I often use is im3, sympathy and xl. So setting the file in / etc / wvdial.conf is:

[Dialer im3durasi]
Init1 = ATZ
Init2 = ATQ0 V1 E1 S0 = 0 & C1 & D2 + FCLASS = 0
Init3 = AT + CGDCONT = 1, "IP", "www.indosat-m3.net"
Modem Type = USB Modem
ISDN = 0
New PPPD = yes
Phone = * 99 *** 1 #
Modem = / dev/rfcomm1
Username = indosat @ duration
Password = indosat @ duration
Baud = 460800

[Dialer im3]
Init1 = ATZ
Init2 = ATQ0 V1 E1 S0 = 0 & C1 & D2 + FCLASS = 0
Init3 = AT + CGDCONT = 1, "IP", "www.indosat-m3.net"
Modem Type = USB Modem
ISDN = 0
New PPPD = yes
Phone = * 99 *** 1 #
Modem = / dev/rfcomm1
Username = gprs
Password = im3
Baud = 460800

[Dialer indosat3g]
Init1 = ATZ
Init2 = ATQ0 V1 E1 S0 = 0 & C1 & D2 + FCLASS = 0
Init3 = AT + CGDCONT = 1, "IP", "satelindogprs.com"
Modem Type = USB Modem
ISDN = 0
New PPPD = yes
Phone = * 99 *** 1 #
Modem = / dev/rfcomm1
Username = indosat
Password = indosat
Baud = 460800

[Dialer xl]
Init1 = ATZ
Init2 = ATQ0 V1 E1 S0 = 0 & C1 & D2 + FCLASS = 0
Init3 = AT + CGDCONT = 1, "IP", "www.xlgrps.net"
Modem Type = USB Modem
ISDN = 0
New PPPD = yes
Phone = * 99 *** 1 #
Modem = / dev/rfcomm1
Username = xlgprs
Password = proxl
Baud = 460800

[Dialer telkomsel]
Init1 = ATZ
Init2 = ATQ0 V1 E1 S0 = 0 & C1 & D2 + FCLASS = 0
Init3 = AT + CGDCONT = 1, "IP", "flash"
Modem Type = USB Modem
ISDN = 0
New PPPD = yes
Phone = * 99 *** 1 #
Modem = / dev/rfcomm1
Username = wap
Password = wap123
Baud = 460800

[Dialer flash]
Init1 = ATZ
Init2 = ATQ0 V1 E1 S0 = 0 & C1 & D2 + FCLASS = 0
Init3 = AT + CGDCONT = 1, "IP", "flash"
Modem Type = USB Modem
ISDN = 0
New PPPD = yes
Phone = * 99 *** 1 #
Modem = / dev/rfcomm1
Username =
Password =
Baud = 460800

Okay, after that search to find a bluetooth mobile phone bluetooth mobile phone on your computer / PC and then connect / pair and the same input passkey between the phone and the computer / PC (make sure your phone is always "trusted"). If the phone is set in 1234, then do the same thing for the PC, then it was time to do the dial. Type:

OR im3 wvdial wvdial im3durasi

If that appears as below the internet connection via bluetooth successfully: D

masiqbal @ masiqbal-laptop: ~ $ sudo wvdial im3durasi
-> WvDial: Internet dialer version 1.60
-> Can not get information for serial port.
-> Initializing modem.
-> Sending: ATZ
ATZ
OK
-> Sending: ATQ0 V1 E1 S0 = 0 & C1 & D2 + FCLASS = 0
ATQ0 V1 E1 S0 = 0 & C1 & D2 + FCLASS = 0
OK
-> Sending: AT + CGDCONT = 1, "IP", "www.indosat-m3.net"
AT + CGDCONT = 1, "IP", "www.indosat-m3.net"
OK
-> Modem initialized.
-> Sending: ATDT * 99 *** 1 #
-> Waiting for carrier.
ATDT * 99 *** 1 #
CONNECT
~ [7f ]}#@!}!}!}) 8 }#}$@#}(}"}'}"}"}&}))))%) &B; [1b] R [1d] ( ~
-> Carrier detected. Waiting for prompt.
~ [7f ]}#@!}!}"}) 8 }#}$@#}(}"}'}"}"}&}))))%) &B; [1b] RW: ~
-> PPP negotiation detected.
-> Starting pppd at Sun Mar 8 06:27:37 2009
-> Pid of pppd: 6029
-> Using interface ppp0
-> Pppd: (1 [17]? 1 [17]? 1 [17]
-> Local IP address 10.36.130.51
-> Pppd: (1 [17]? 1 [17]? 1 [17]
-> Remote IP address 10.64.64.64
-> Pppd: (1 [17]? 1 [17]? 1 [17]
-> Primary DNS address 124.195.15.100
-> Pppd: (1 [17]? 1 [17]? 1 [17]
-> Secondary DNS address 124.195.15.98
-> Pppd: (1 [17]? 1 [17]? 1 [17]

Well .. if a show like this gimana?

masiqbal @ masiqbal-laptop: ~ $ sudo wvdial im3durasi
[sudo] password for masiqbal:
-> WvDial: Internet dialer version 1.60
-> Can not open / dev/rfcomm1: No such file or directory

Do not worry ... Try pairing from the computer / PC to a Bluetooth phone with the command

sudo USERCTL bind 1 00:22:98: D1: 57: BE 1

My experience when connecting via bluetooth to the next day always fail if not in re-pairing of the computer / PC to the phone. Still fail too? hehehe ... mas AndyMSE this experience, try DELETE Init2 = ATQ0 V1 E1 S0 = 0 & C1 & D2 + FCLASS = 0 in the file / etc / wvdial.conf, then do not forget to change the line below the original
Init3 = AT + CGDCONT = 1,? IP?,? Www.indosat-m3.net? become
Init2 = AT + CGDCONT = 1,? IP?,? Www.indosat-m3.net?

Fiuuhhh ... finally finished ... hopefully short length guide can help you to connect to the Internet in Ubuntu via bluetooth phone. Hopefully useful ...

http://solvewithit.com/2009/03/08/koneksi-internet-di-ubuntu-via-bluetooth-handphone/

Friday, 21 August 2009

How-To: Measure your bandwidth with SNMP

Considered upgrading your DSL/Cable modem connection lately? Been wondering just how much of that high speed Internet connection you've been using? (Or if one of your kids or housemates is eating up all the bandwidth with BitTorrent again.) Today we'll show you how to use some handy free tools to keep an eye on your precious bandwidth. Hey, it just might save you from having to bleach your eyes if you walk in after Bob's download finishes.


For today's How-To, you'll need:
  • Router, firewall or switch that supports SNMP
  • Linux (or any *nix box, we're using Ubuntu for today)
If you're not familiar with SNMP, never fear, Engadget's here. It's a handy protocol used to collect device information over a network connection. Seriously, you don't need to fully understand it for today's How-To.

Today we'll be setting up a free utility called MRTG (Multi Router Traffic Grapher) to help keep an eye on how much bandwidth we're using. It can run on Windows or Linux (or other *nix operating systems). We'll set it up under Ubuntu Linux to collect data at five minute intervals and draw some pretty graphs.

First, we'll need to configure SNMP on whatever firewall, router or network switch you have. (Managed switches support it, but el cheapo hubs won't.) It's not hard, all you need to do is turn on SNMP if there's an option, and configure the SNMP strings.

A SNMP string acts as a simple login for SNMP queries. If you have the right string, you can connect. The read only string is usually set by default to public. Most home network routers actually support SNMP, but you may have to do some hunting to find out how to turn it on. (To get SNMP on the WRT54G, you might want to check out the WiFi-Box firmware.)

For today's How-To you only need to set up a read only string. We suggest changing the read/write string to something no-one will ever guess. (Read / Write access can be used to alter the configuration of a device)

If you followed How-To: Build your own Network Firewall and have a Devil-Linux firewall, then edit /etc/snmpd.conf and add the following:
syslocation "home"
syscontact you@yourdomain
rocommunity public

Don't forget to run save-config when you're done! Once the config it saved, snmpd will start up automatically at boot. For now, start up the snmp deamon by hand. Run the following as root.
/etc/init.d/snmpd start


Once you've managed to activate SNMP on your network device, head over to your *nix box. We'll walk you through setting everything up under Ubuntu Linux today.

Open up Synaptic and search for mrtg. Install it, along with the contrib package. While you're in there, install a copy of Apache web server. (No, it doesn't really matter which version. Um, we like Apache2. yeah.)

When it's done, pull up a shell and run the following command to set up MRTG.
cfgmaker --global 'WorkDir:/var/www/mrtg' \
--global 'Options[_]: bits,growright' \
--output /etc/mrtg.cfg \
public@192.168.1.1

The workdir is where all the data will get stored, the options make things pretty, the output sets the location of the config file, and public is the read only snmp community string you set up. 192.168.1.1 is the ip address on the lan side of the router/firewall/switch you're monitoring. If want to run cfgmaker as a regular user, store the config in your home directory.

If your crazy long command succeeded, you should have a spiffy new config file for MRTG to play with. To get it collecting data every five minutes (plenty for the graphs that MRTG makes) run the following command (as whatever user you want to run MRTG as):
crontab -e
This will edit your crontab. Here you can schedule commands to run at regular intervals. Put the following on one line of the crontab:
0,5,10,15,20,25,30,35,40,45,50,55 * * * * env LANG=C /usr/bin/mrtg /etc/mrtg.cfg --logging /var/log/mrtg.log

Save the file and MRTG will be set to collect data every five minutes. Nice, eh? The env C line is a fix for running MRTG under Ubuntu. It might not be neccesary for your machine, but we needed it.

Once it runs a few times, point your web browser at the machine you're running mrtg on. http://localhost/mrtg if you're on your Linux box. There you'll find a collection of images and html pages. You might want to view these or build an index page with links to the images for each interface you want to keep an eye on.

Troubleshooting suggestions:
Permissions are a big part of the game. As long as the user that's running MRTG can read the config file and has write access to the /var/www/mrtg directory, you should be golden. You may wish to create a user just for MRTG and keep everything in its home directory. Then you can point Apache at that directory. Check out the documentation at the MRTG homepage for more.

Good luck, and remember, this will only tell you how much traffic you've got pumping in an out -- it won't prioritize your network traffic over the others' using the pipe. We find the easiest way to take care of that is using MRTG to find the bandwidth hogs, and then walking over to their machines and unplugging them. Enjoy!