DBC Network

Tuesday 3 November 2009

Cable modem hacker busted by feds

An expert on cable modem hacking has been arrested by federal authorities on computer intrusion charges.

According to the U.S. Department of Justice (DOJ), Ryan Harris, 26, ran a San Diego company called TCNISO that sold customizable cable modems and software that could be used to get free Internet service or a speed boost for paying subscribers.

Harris, also known as DerEngel, was charged on Aug. 16, but the grand jury indictment was not unsealed until Monday, several days after his Oct. 23 arrest. He faces a maximum sentence of 20 years in prison and a US$250,000 fine, the DOJ said. The six-count indictment charges him with conspiracy, computer intrusion and wire fraud.

Hackers have known for years that certain models of cable modem, such as the Motorola Surfboard 5100, can be hacked to run faster on a network, a process known as uncapping. However, the question of whether uncapping a modem is illegal is “not clear,” according to Bill Pollock, founder of No Starch Press, which published Harris’s 2006 how-to book Hacking the Cable Modem.

Cable modems can also be configured to use a paying customer’s MAC (Media Access Control) address to steal service. According to the indictment, Harris helped develop tools that could be used to sniff MAC addresses in order to get on the network free.

Harris isn’t the first person to be charged with this type of activity. In January, Thomas Swingler was charged with selling cable modems that could be customized to getfree Internet service. – Macworld

Belkin F5D7630


Type in your web browser at http://192.168.2.1
The password is set by default (blank) , click the submit button


Click the Wizard link on the top menu bar.
Select the Connection Type
Click NEXT


Enter the username, password and The VPI/VCI values by isp
Click NEXT


Click the Apply button to store these settings in the router


This screen tells you what your Internet IP address is (the WAN IP), and you will note that the menu bar at the top of the page now shows the Internet Status as connected.


Wireless Configuration

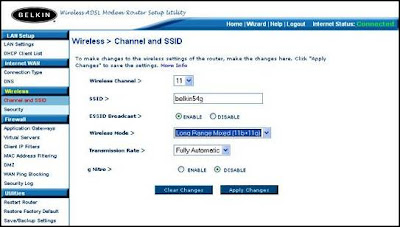
Click Wireless menu in the left frame then click Channel and SSID
Select the wireless Channel
Type a SSID. The default SSID is belkin54g
Tick Enable for ESSID Broadcast
Select Wireless Mode
Select Transmission Rate as Fully automatic
Click Aplly Changes button


The security of the wireless connection is covered under a different screen.
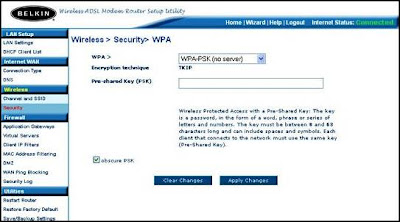
Click Security in Wireless menu


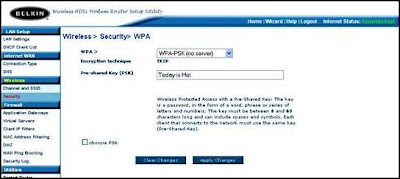
The first step is to select WPA-PSK (no server) on the router, and enter a key.


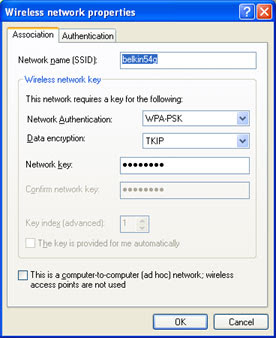
Notice how for the Windows XP wireless configuration you have to select TKIP for the data encryption. If you do get the keys correct then you should find the computer is given an IP address from the router, and that Internet access will work. There is no indication in Windows that you have got the key wrong, which can mislead people at times. At least with WPA there is not the confusion caused by hexadecimal and ASCII input methods


END.

2 WIRE 2000 - SERIES


Configuring the Internet Connection

Now that your first computer is connected to the gateway, you need to configure your gateway to communicate with your Internet service provider. To activate your Internet account:

Type http://192.168.1.1


Choose Broadband Link Tab
Click Advance Setting


You may be prompted to enter service provider information such as Encapsulation, username and password. Enter any required service provider information.

Click SAVE

The connection process will begin. During this process the INTERNET light on the front of the gateway will first blink green then turn solid green. This step could take up to five minutes as the gateway searches for your broadband service.

The gateway will now connect to the Internet. This process may take several minutes. If the registration screen opens, click the REGISTER button and complete the 2Wire registration process.

END.

----------------------------------------------------------------------------------------------------------
WIRELESS SETTING

Open a Web browser and access the 2Wire gateway user interface by entering HTTP://192.168.1.1
Click the Home Network tab.
Click the Wireless Settings


Click SAVe

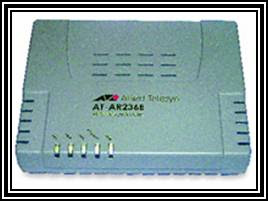
Allied Telesyn AT-AR236E

ALLIED TELESYN AT-AR236E


Type Router’s default IP address : 192.168.1.1


Insert Username : manager dan Password : friend, then Click Log In


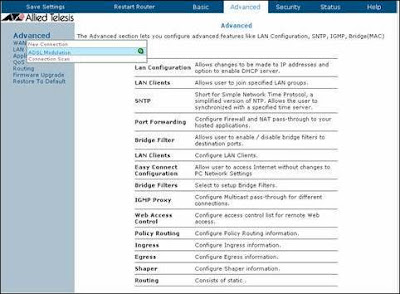
ALLIED TELESYN AT-AR236E’s Home


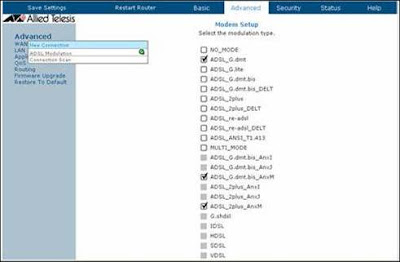
Click AdvancedWANADSL modulation


Tick ADSL_G.dmt box in Modem setup menu
Click Apply


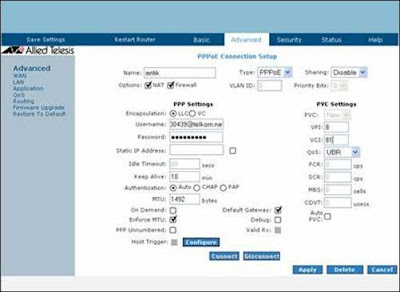
Click Advanced WANNew Connection


Insert a unique name (eg. antic) in coloum name
Select your protocol type (PPPoE / PPoA)
Insert the username & password, VPI/VCI, Qos (UBR)
Click Apply
Click Save Settings


Click OK


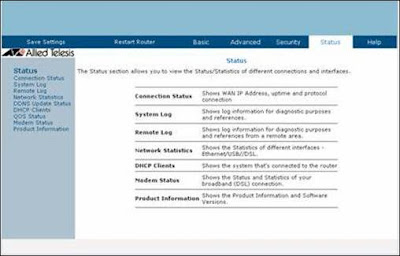
Click Status
Click Connection Status


Modem ALLIED TELESYN is now connected

Internet Setting Modem Speedy With Allied Telesyn

Tutorial for setting menggunaka Internet with a modem ISP TelkomSpeedy and Allied Telesyn.

Setting Bridge
After all the cable is connected and on a PC modem and the first step to know the IP Modem is:

1.Klik Start, select Run and then click
-2. In the Open: type in "cmd" and press the small letters "okay:

On the PC will display a black screen that is:

C: \ Ducuments and Settings \ Administrator> _
and type; ipconfig (lowercase) then hit enter
Will appear:
IP Address ... ... ... ... ... ..: 192.168.1.2
Subnet Mask ... ... ... ... ..: 255.255.255.0
Default Gateway ... ... ...: 192.168.1.1

This is to know how IP Modem.

Then type: ping 192.168.1.1
Press enter
If the modem responds will appear;
Reply from 192.168.1.1 dstnya ... ...

We've been able to call Modem Allied Telesyn Through Internet Explorer

* Click Internet Explorer
* Proxy in Internet Explorer must be emptied
* In the Address type: 192.168.1.1 and press enter
* Go to Allied Telesyn
* User name: type in "manager" to lowercase
* Password: type in "friend" to lowercase
* Then press the "log in"

Sign in to menu Allied Telesyn
1.Select menu "Advanced" crusor directed above,
then click
2. Crusor Navigate to the "WAN" on the left
There menu New Connection
ADSL Modulation
Quickstart
3. Select the "Quickstart" and click
Going to:
Set Up PPPoE Connections
- No writing "Delete" under the right, point to Delete crusor then click
nKembali to:
Allied Telesyn>
1.Arah a crusor to the menu "WAN" on the left
2.Pilih New Connection, then
3.Connection Name: "Quickstart" change
with the "Speedy"
4. Type: select "Bridge"
5. Encapsulations: select "LLC"
6. Select LAN: select the LAN group 1
7. PVI: type 8
8. VCI: 81 type
9. QoS: UBR
10. Others ignore them (leave the existing match)
11. Right under the words "Apply" to Apply crusor point and click
1. After that navigate to the menu crusor
"Save Settings" at the top left and then click
2.Your settings have been saved?
crusor navigate to "OK" and then click
After that;
1.Arahkan crusor to the menu "Restart Router"
then click
2.RESTART? Dstnya ... ... ... ....
crusor navigate to "OK" and then click
3.Restarting ... ... ... ..
Will restart the modem, wait 1 to 2 minutes to return to the original menu (log in) and the DSL light up.
Modem settings completed Allied Telesyn
Click Icon Speedy
Click "connect"
Speedy is now connected
Good luck

Allied Telesyn modem PPPoE Settings

Click Internet explorer
Type 192.168.1.1 in the Address and enter
Sign in to Allied Telesyn
User name: type manager (lowercase)
Password: type your friend (lowercase)
Then navigate to the word crusor "Log In"
and click
Sign in to menu Allied Telesyn
1.Arahkan crusor to "WAN" on the left
There menu New Connection
ADSL Modulation
Quickstart
2.Pilih "Quickstart" and click
Going to:
Set Up PPPoE Connections
- No writing "Delete" under the right, point to Delete crusor then click

Back to:
Allied Telesyn>
Right direction crusor to the menu "WAN" on the left
1.Select New Connection, then
2.Connection Name: "Quickstart" change
with the "Speedy"
4. Type: select "PPPoE"
5. Encapsulations: select "LLC"
6. Users type the user name with the full sample speedy 111209001234@telkom.net
7. Type the appropriate password and true as I awarded TELKOM
8. PVI: type 8
9. VCI: 81 type
10. QoS: UBR
10. Others ignore them (leave the existing match)
11. Right under the words "Applyt" crusor navigate to and click Apply
1.Setelah it crusor to navigate menus
"Save Settings" at the top left and then click
2.Your settings have been saved?
crusor navigate to "OK" and then click
After that;
1.Arahkan crusor to the menu "Restart Router"
then click
2.RESTART? Dstnya ... ... ... ....
crusor navigate to "OK" and then click
3.Restarting ... ... ... ..
Will restart the modem, wait 1 to 2 minutes to return to the original menu (log in) and the DSL light up.
If typing username and password correctly.
LINK lights are up
Lights Eth / Act up
Lights Up PPP
Then be able to browse.

Good luck.

source: http://anhum_80.blog.plasa.com/2009/08/16/mensetting-modem-allied-telesyn/

Smart Modem Speed Tricks

I want to talk how to speed up this smart internet seems absolutely it is not possible. This is because the number of users and channels are used cdma fixed capacity. But here there will be some way to slightly speed up the connection through the settings on your computer (windows), the browser, and APN (Access Point Name) is not busy.

1. SETTING COMPUTER / WINDOWS

These settings are general settings for all Internet connections, which seeting QoS Packet Scheduler and TCP / IP.

If using QoS Packet in Sceduler please edit the Group Policy (gpedit.msc). Sign in Computer Configuration - Administrative Templates - Network - QoS Packet Scheduler. Fox Limit Outstanding Packets from not configured to be enabled and the Bandwidth Limit (%) = 0. This will save you 20% of our bandwidth is used by Microsoft.

In the TCP / IP services can we set on the regedit, which is in HKLM \ system \ CurrentControlSet \ Services \ tcpip \ parameters and editing the register values on:

* DefaultTTL content value 00000040
* EnablePMTUBHDetect content value 00000000
* EnablePMTUDiscovery content value 00000001
* GlobalMaxTcpWindowSize content value 0005ae4c
* SackOpts content value 00000001
* Tcp1323Opts content value 00,000,003
* TcpWindowSize content value 0005ae4c
* Restart your PC

2. INTERNET BROWSER SETTINGS AND TOOLS

* To optimize the browser, we can use the way Accelerating Firefox & Mozilla

3. APN SETTING SMART

Due to the busy line is used in # 777 username and password smart. Try to combine dialup * 777 # or 222 or * 99 # or * 31 * 11,111 # with the username and password or wap cdma.
post by virtual worlds info

Using the Sony Ericsson W960 In 3G Modem

Mobile Internet era now. Internet type this one does not know the place and time. Anytime and anywhere motto. Various ways can be used to connect to the virtual world, including looking for places Hotspot facility. Hotspots are found both on campus, in malls, even in the fast-food restaurant, you find any hotspots. But not all free hotspots. There are also paid, for example using a specific voucher will you get if you buy the goods at the facility where these hotspots. The next way to use the Mobile Internet is to rely on 3G USB Modem. Devices that lately so it can dibanderol boom with prices ranging 500rb ~ 2jutaan, and even then not including subscription fees providers. So instead of buying a 3G modem much for expensive, why guns maximize existing device?

These tips are how to use the handset w960 / i as a 3G modem.

This required, among others:

1. Henpon beloved, w960i
2. Data cable
3. Computers / Laptop
4. Pulse

Making Connections

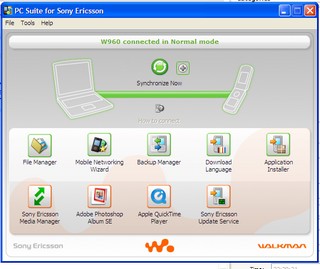
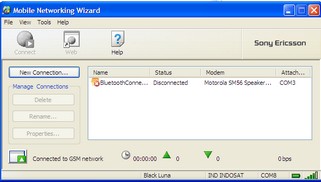
The first step you should do is to connect the data cable to connect it to w960 before the computer / laptop. Then in henpon select Normal Mode. Start the Sony Ericsson PC Suite followed by select Mobile Networking Wizard.

W960 connected

Mobile Networking Wizard

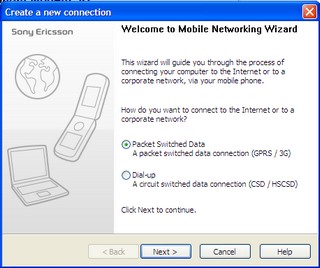
Because there is no connection type, then we must create a new connection (I pake Indosat-GPRS). To create a new connection, select New Connection -> select Packet Switched Data (GPRS/3G)

Wisaya 1

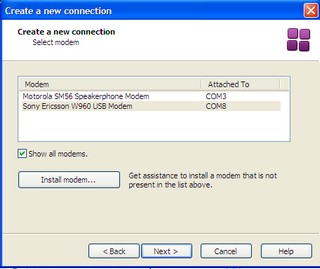
Port will then be determined how that will be used for the modem. Select the Sony Ericsson W960 USB Modem.

Wisaya 2

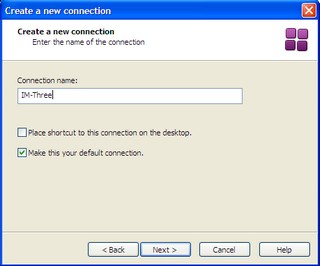
Then fill in the Connection name column with the name of your connection, let IM-three.

Wisaya 3

After that the system will display the wizard to determine which ISP you use to connect to the Internet. Because I use Indosat M3, so I select ID IM3 and I select the Automatic Mode. Then Finish and ISP settings are stored in henpon.

ps: if an error message displays "Your connection requires a data account in the mobile phone" then you should turn off the GPRS connection is still active on the henpon or use manual mode feature on the selection and arrangement of connections will be drawn from the GPRS settings on henpon tsb.

Starting the Internet Connection

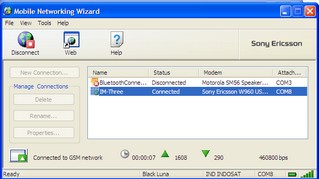
After completing the network settings then we can make an internet connection. The trick is as follows; Run PC Suite and then Select Mobile Networking Wizard. Then select the type of connection will be used to to the internet (which had been created), select connect.

Connected

If already connected, then you are able to start internet ria. Hopefully these tips useful for the mooi-ers.

Setting Modem Huawei IndosatM2 at 156/160 with Ubuntu

Not as difficult as ever to make the modem settings to connect to the virtual world. I use a modem Huawei 156 - IM2 in Ubuntu 9.04. This paper results from the application of this blog tutorials. But after a try is not working. Finally, combining the command wvdial is here. Finally connected to the outside world.
But do not forget to first install wvdial in ubuntu yes. But if you have not got a dvd you have to have the repository Donwload deb files from your computer can reply koneks internet first.

http://id.archive.ubuntu.com/ubuntu/pool/main/x/xplc/libxplc0.3.13_0.3.13-1build1_i386.deb
http://id.archive.ubuntu.com/ubuntu/pool/main/w/wvstreams/libuniconf4.4_4.4.1-0.2ubuntu2_i386.deb
http://id.archive.ubuntu.com/ubuntu/pool/main/w/wvstreams/libwvstreams4.4-base_4.4.1-0.2ubuntu2_i386.deb
http://id.archive.ubuntu.com/ubuntu/pool/main/w/wvstreams/libwvstreams4.4-extras_4.4.1-0.2ubuntu2_i386.deb
http://id.archive.ubuntu.com/ubuntu/pool/main/w/wvdial/wvdial_1.60.1 nmu2_i386.deb

After that double click each of the deb file.

Here's my reply 9:04 applied to ubuntu by editing the wvdial.conf file that can be accessed from the folder / etc / wvdial.conf as written below. Ngedit wvdial.conf file double-click it to stay the course if the file already, please save.

[Dialer usb]
Init1 = ATZ
Init2 = ATQ0 V1 E1 S0 = 0 & C1 & D2 FCLASS = 0
init3 = AT CGDCONT = 1, "IP", "IndosatM2"
Modem Type = USB Modem
Dial Command = ATDT
Stupid Mode = 1
New PPPD = yes
Baud = 460800
Modem = / dev/ttyUSB0
ISDN = 0
Phone = * 99 #
Password = enter the password here
Username = enter a user name at the IM2 register here
ISDN = 0
Auto DNS = 1

To connect to the virtual world open "Terminal-Console" and then type in the terminal screen:
su-c "wvdial usb"
Enter the root password on your ubuntu.

Next open your web-browser.

Enjoy.

A10216 Mantis Cocoon Elevo, now with Modem 3.5 G


To answer the demand of mobile users who need an Internet connection anywhere, is now complete Elevo Mantis Cocoon series with his 3.75 G Modem HSUPA (High-Speed Uplink Packet Access). In this way, users can easily to the Internet without the need to install an external modem is sometimes inconvenient.

Although mentioned as a new series (type A10216), design and facilities of this netbook like the previous model which was not accompanied HSUPA modem. The differences that arise in addition to additional 3G modem is the increased memory capacity to 2GB and 2X capacity batteries (4400 mAh). Both upgrades are obviously very means to improve endurance performance and usage.

To support the daily activities, Mantis Cocoon A10216 facilities equipped with wireless, LAN, and 1.3 megapixel webcam. Bluetooth connection is also available although presented in a separate dongle to be plugged in the USB port to enable it.

Like other netbooks, the device is equipped with operating system Windows XP Home Edition. The price offered was quite competitive in its class. To be more attractive, Elevo distributors also provide 3-year warranty service and spare parts. This offer is certainly attractive than its competitors. However, Elevo must find a way to fight with the first players in attendance.
***


If you are looking for Intel Atom based netbook with a fairly complete specification, Cocoon Elevo Mantis of this A10216 become an attractive option. The increase in facilities HSUPA modems, memory, and battery capacity to support the superior points of work activities and the Internet. However, due to still use the CPU Atom N270, this device can not perform except on a few outstanding graphics capabilities, and time use a long netbook.

Source: InfoKomputer

PLUS: good battery life; there HSUPA modem and 2 GB of RAM.

MINUS: Bluetooth dongle needed, weighs 200 grams increased.


SCORING ASSESSMENT
(maximum 5)
Performance: 3.75
Facilities: 4.3
Usage: 3.8
Price: 4
TOTAL SCORE: 3.97


TEST RESULTS
Mantis Cocoon Elevo presents new battery and the RAM is doubled. The results batteries produce more durability than its predecessor (Mantis A10116). But the other test results do not differ much because the processor is still the same carried.


Testing


Mantis Cocoon Elevo

A10216-3, 75G HSUPA

Mantis Cocoon Elevo
A10116
Cinebench R10

17 minutes 30 seconds

18 mins 30 mins
Video encoding

57 minutes 19 seconds

57 minutes 5 seconds
Audio encoding

19 minutes 7 seconds

15 minutes 47 seconds
3DMark 2006

89

--
Battery life


Playing HD Video

3 hours 20 minutes 26 seconds

1 hour 46 minutes 26 seconds
Battery Eater

3 hours 01 minutes 41 seconds

1 hour 34 minutes 47 seconds


Specifications ELEVO Mantis Cocoon A10216

Processor: Intel Atom N270 (1.6 GHz, 512 MB cache, 533 MHz FSB)
RAM: 2GB DDR2
Chipset: Intel i945GME
Graphics Card: GMA 950 128MB
Harddisk: Western Digital 160GB HDD
Optical drive: No

Facilities: Wi-Fi b / g, 3.5 G HSUPA modem, LAN, Bluetooth, card reader, USB (3), 1.3 MP webcam, VGA-out, microphone, headphones, and bag netbook.
Screen: 10.1 ", resolution 1024 x 600 pixels
Sound card: Realtek HD audio
Operating System: Windows XP Home Edition
Battery: Li-Ion 4400 mAh
Dimension: 26.5 x19, 6x (3,4-3,7) cm
Weight: 1.4 kg
Warranty: 3 years
Web site: www.elevo.co.id
Price range *: USD 4,988,000

* Indonesia Elevo Technologies, (021) 6231-1235

Sunday 1 November 2009

Alcatel Speed Touch USB ADSL Annex A, B

Alcatel logo

Alcatel SpeedTouch 240 picture

Specifications

Click on a link to search for more drivers, etc.. (EEPROM or Chipset Family/Name are especially good for this).

Modem Specifications
Manufacturer: Alcatel Microelectronics
Features: ADSL
Max Communication Protocol: G.992.1 A (G.dmt)
G.992.1 B (G.dmt)
G.992.2 (G.lite)
PPPoA (RFC2364)
PPPoE (RFC2516)
T1.413 Issue 2
Communication Buses: USB
OS Platforms: Apple Mac OS 8.6
Apple Mac OS 9
Apple Mac OS X
Linux k 2.4
Linux k 2.6
Windows 2000
Windows 95/98
Windows Me
Windows XP
Chipset: Manufacturer: Alcatel Microelectronics
Family Type: xDSL Controllerless
Family: DynaMiTe 5 USB ADSL Controllerless
Name: MTK-20152 ADSL DynaMiTe USB Annex-A
Hardware IDs: BABT:
FCC: 6VUBEL-35680-DL-N
EEPROM ID: USB\VID_06B9&PID_4061&REV_0000
USB\VID_06B9&PID_4061&REV_0001

See Also

The following modems are connected with this modem in some way - often the same modem under a different name, or the other members of a Family of modems. Check out Info above for (maybe) further details.

Alcatel Speed Touch 330 ADSL USB (Rev 2)
Alcatel Speed Touch 330 ADSL USB (Rev 4)
Alcatel Speed Touch 530 ADSL Residential USB Gateway-v4

Broadcom 802.11 Wireless LAN

These are all the Chipset Families + their chipsets known to exist within Broadcom’s 802.11 Wireless LAN chipset Type:

Windows logo Linux 2.2 logo Novell logo Linux 2.4 logo

Chipset Family Chipset
BCM43xx 802.11abg WLAN Dual-Band BCM4306 Dual-Band WLAN CardBus
BCM4306 Dual-Band WLAN miniPCI
BCM4306 Dual-Band WLAN miniPCI+3
BCM4309 Dual-Band WLAN CardBus
BCM4309 Dual-Band WLAN miniPCI
BCM4312 WLAN-abg MiniCard
BCM4318 Dual-Band WLAN CardBus
BCM4318 Dual-Band WLAN miniPCI
BCM4320 Dual-Band WLAN-abg USB
BCM43xx 802.11bg WLAN BCM4301 WLAN-b CardBus
BCM4301 WLAN-b MiniPCI
BCM4301 WLAN-b PCMCIA
BCM4301 WLAN-bg CardBus
BCM4301 WLAN-bg MiniPCI
BCM4301 WLAN-bg MiniPCI+3
BCM4306sg WLAN-bg CardBus
BCM4306sg WLAN-bg MiniPCI
BCM4311 WLAN-bg MiniCard
BCM4318 WLAN-bg CardBus
BCM4318 WLAN-bg MiniPCI
BCM4320 WLAN-bg USB
BCM43xx 802.11n WLAN BCM4321 WLAN-n CardBus
BCM4321 WLAN-n Mini-PCI
BCM4321 WLAN-n PCI-X
BCM47xx 802.11bg WLAN BCM4702-0D WLAN-bg AP
BCM4702AGR WLAN-abg Router
BCM4702AP WLAN-bg AP
BCM4702BR WLAN-b Router
BCM4710-R1 WLAN-b HPNA Router
BCM4710-R1 WLAN-bg HPNA Router
BCM4710-R4 WLAN-bg HPNA Router
BCM4710AGR WLAN-abg HPNA Router
BCM4710D WLAN-bg HPNA AP/Router
BCM4711AP WLAN-b AP
BCM4712P WLAN-bg AP

GVC Modems

GVC logo

14.4AM(SP) Modem-Soundcard
24DBF Data Fax ISA
A701 56k Data-Fax ISA PnP
ASF-1156HV+/R19 56k Data-Fax-Speakerphone ISA PnP
ASF-1156HV/R19 56k Data-Fax-Speakerphone ISA PnP
ASF-1156V+/R19 56k Data-Fax-Speakerphone External
ASF-1156V/R19 56k Data-Fax-Speakerphone External
Atheros AR5006XS 11abg WLAN
CPQ0290 Conexant 56K Data-Fax PCI (FCC)
CPQB0BC Conexant 56K Data-Fax PCI (FCC)
CPQB114 Conexant 56K Data-Fax PCI (FCC)
D-1128HVT1/R12-P V.34 Data-Fax-Speakerphone ISA PnP
D-1128NZ1/R9 V.34 Data-Fax ISA PnP
D-1156/A1A Agere PCI V.92 Soft
D-1156IV/P2 56k Data-Fax PCI
DF-1128HV/A2 V.34 Data-Fax-Speakerphone ISA PnP
DF-1133HV+/A2 V.34 Data-Fax-Speakerphone ISA PnP
DF-1133HV/A2 V.34 Data-Fax-Speakerphone ISA PnP
DF-1133HV/R16 V.34 Data-Fax-Speakerphone ISA PnP
DF-1133V/R16 V.34 Data-Fax-Speakerphone External
DF-1156HV+/R19 56k Data-Fax-Speakerphone ISA PnP
DF-1156HV/A2B 56k Data-Fax-Speakerphone ISA
DF-1156HV/R19 56k Data-Fax-Speakerphone ISA PnP
DF-1156HV/R19-DL 56k Data-Fax-Speakerphone ISA PnP
DF-1156IV+/A2 56k Data-Fax-Speakerphone PCI
DF-1156IV+/R3 56k Data-Fax-Speakerphone PCI
DF-1156IV/A2 56k Data-Fax-Speakerphone PCI
DF-1156IV/R3 56k Data-Fax-Speakerphone PCI
DF-1156V+/R19 56k Data-Fax-Speakerphone External
DF-1156V/R19 56k Data-Fax-Speakerphone External
F-1114HV/R2 V.32bis Data-Fax ISA
F-1114V/R6 V32bis Data-Fax External
F-1128HV+/R6 V.34 Data-Fax ISA
F-1128HV+/R9 V.34 Data-Fax-Voice ISA PnP
F-1128HV/R6 V.34 Data-Fax ISA
F-1128HV/R9 V.34 Data-Fax-Voice ISA PnP
F-1128HV/T1 33.6K Data-Fax ISA PnP
F-1128V+/R6 V.34 Data-Fax External
F-1128V/R6 V.34 Data-Fax External
F-1128V/T2 V.34 Data-Fax External
F-1133HV+/R6 V.34 Data-Fax ISA
F-1133HV/R6 V.34 Data-Fax ISA
F-1133PV+/R6 V.34 Data-Fax PCMCIA
F-1133PV+/R9 V.34 Data-Fax PCMCIA
F-1133V+/R6 V.34 Data-Fax External
F-1133V/R6 V.34 Data-Fax External
F-1156HV+/A5 56k Data-Fax ISA
F-1156HV+/T3 56k Data-Fax ISA PnP
F-1156HV/A5 56k Data-Fax ISA
F-1156HV/AS 56k Data-Fax ISA PnP
F-1156HV/R19 56k Data-Fax ISA PnP
F-1156HV/R19-DL 56k Data-Fax ISA PnP
F-1156HV/T3 56k Data-Fax ISA PnP
F-1156I+/R2F V92 Data Fax PCI (Dell Herradura)
F-1156I/R2F V92 Data Fax PCI (Dell Patron)
F-1156IV+/A2A 56k Data-Fax-Voice PCI
F-1156IV+/E1D 56k Data-Fax-Voice-TAM PCI
F-1156IV+/R12 V.92 Data-Fax PCI
F-1156IV+/R2 56k Data-Fax-Voice PCI
F-1156IV+/R2D 56k Data-Fax-TAM PCI
F-1156IV+/R6 56k Data-Fax PCI
F-1156IV+/R9 56k Data-Fax-Voice PCI
F-1156IV+/R9A 56k Data-Fax-Voice PCI
F-1156IV+/R9C 56k Data-Fax PCI (Dell Silver)
F-1156IV+/R9C 56k Data-Fax-Voice-TAM PCI
F-1156IV+/R9D 56k Data-Fax-Voice-TAM PCI
F-1156IV/A2A 56k Data-Fax-Voice PCI
F-1156IV/E1D 56k Data-Fax-Voice-TAM PCI
F-1156IV/R2 56k Data-Fax-Voice PCI
F-1156IV/R2D 56k Data-Fax-TAM PCI
F-1156IV/R6 56k Data-Fax PCI
F-1156IV/R9 56k Data-Fax-Voice PCI
F-1156IV/R9D 56k Data-Fax-Voice-TAM PCI
F-1156IV/R9F 56k Data-Fax PCI (Dell Copper)
F-1156V+/K1D 56k Data-Fax-Voice External
F-1156V+/T3 56k Data-Fax External
F-1156V/K1D 56k Data-Fax-Voice External
F-1156V/K2D 56k Data-Fax-Voice External
F-1156V/T3 56k Data-Fax External
F-9424H/R1 V.22bis Data-Fax ISA
F-942H/R1 2400-9600 Data Fax ISA
FM-144HVBIS/R1 V.32bis Data-Fax ISA
FM-144VBIS/R V.32bis Data-Fax External
FM-56PCI/HSF-IL
FM-9648 Fax Modem External
FM-9696 External
FM144-144V(P) 14.4k PCMCIA
FM144C V.32bis Cirrus PCMCIA
FM144D V.32bis Cirrus PCMCIA
FM144INT V.32bis Lucent PCMCIA
FM288B V.34 Lucent PCMCIA
FM288INT V.34 Lucent PCMCIA
FM288LK V.34 Lucent PCMCIA
FM288M V.34 AT&T PCMCIA
FM288T V.34 AT&T PCMCIA
FM336C V.34 Rockwell PCMCIA
FM336INT V.34 Rockwell PCMCIA
FM336LK V.34 Lucent PCMCIA
FM336SK V.34 Cirrus PCMCIA
FM336XT V.34 AT&T PCMCIA
GVC02C0 Conexant 56K Data-Fax PCI
GVC5005 Lt Win Modem Data-Fax-Voice-DSVD ISA PNP
PB-144HV/R6 Modem Fax ISA
PFM-964824 Faxmodem PCMCIA
SF-1017 56k Data-Fax-Speakerphone SVD ISA PnP
SF-1128HV+/R9 V.34 Data-Fax-Speakerphone ISA PnP
SF-1128HV/R12 V.34 Data-Fax-Speakerphone ISA
SF-1128HV/R9 V.34 Data-Fax-Speakerphone ISA PnP
SF-1133HV+/R16 V.34 Data-Fax-Speakerphone ISA PnP
SF-1133HV/C3 V.34 Data-Fax-Voice ISA PnP
SF-1133HV/R12 V.34 Data-Fax-VoiceView ISA PnP
SF-1133HV/R16 V.34 Data-Fax-Speakerphone ISA PnP
SF-1133HV/T2 V.34 Data-Fax-TAM-Speakerphone ISA PnP
SF-1133V+/R16 V.34 Data-Fax-Speakerphone External
SF-1133V+/R6 V.34 Data-Fax-Speakerphone External
SF-1133V/R V.34 Data-Fax-Speakerphone External
SF-1133V/R16 V.34 Data-Fax-Speakerphone External
SF-1156HV+/R19 56k Data-Fax-Speakerphone ISA PnP
SF-1156HV+/R19-P 56k Data-Fax-Speakerphone ISA PnP
SF-1156HV+/R21 56k Data-Fax-Speakerphone ISA PnP
SF-1156HV/R19 56k Data-Fax-Speakerphone ISA PnP
SF-1156HV/R19-DL 56k Data-Fax-Speakerphone ISA PnP
SF-1156HV/R21 56k Data-Fax-Speakerphone ISA PnP
SF-1156HV/T3 56k Data-Fax-Speakerphone ISA PnP
SF-1156HV/T4 56k Data-Fax-Speakerphone ISA PnP
SF-1156I+/R2F V92 Data Fax Voice PCI (Dell Chromium)
SF-1156I/R2F V92 Data Fax Voice PCI (Dell Zinc)
SF-1156IV+/B2D 56k Data-Fax-Speakerphone-TAM PCI
SF-1156IV+/M1D 56k Data-Fax-Speakerphone-TAM PCI
SF-1156IV+/R2D 56k Data-Fax-Speakerphone-TAM PCI
SF-1156IV+/R9A 56k Data-Fax-TAM-Speakerphone PCI (Dell Graphite)
SF-1156IV+/R9D 56k Data-Fax-Speakerphone-TAM PCI
SF-1156IV/B2D 56k Data-Fax-Speakerphone-TAM PCI
SF-1156IV/M1D 56k Data-Fax-Speakerphone-TAM PCI
SF-1156IV/R2D 56k Data-Fax-Speakerphone-TAM PCI
SF-1156IV/R9A 56k Data-Fax-Speakerphone-TAM PCI
SF-1156IV/R9D 56k Data-Fax-Speakerphone-TAM PCI
SF-1156IV/R9E Data-Fax-TAM-Speakerphone PCI (Dell Titanium)
SF-1156V+/B1D 56k Data-Fax-Speakerphone-TAM External
SF-1156V+/K1D 56k Data-Fax-Speakerphone-TAM External
SF-1156V+/R19 56k Data-Fax-Speakerphone External
SF-1156V+/R19-P 56k Data-Fax-Speakerphone External
SF-1156V+/R21 56k Data-Fax-Speakerphone External
SF-1156V+/R21D 56k Data-Fax-Speakerphone-TAM External
SF-1156V/A5 56k Data-Fax-Speakerphone External
SF-1156V/B1D 56k Data-Fax-Speakerphone-TAM External (US)
SF-1156V/K1D 56k Data-Fax-Speakerphone-TAM External
SF-1156V/R 56k Data-Fax-Speakerphone External
SF-1156V/R19 56k Data-Fax-Speakerphone External
SF-1156V/R19-DL 56k Data-Fax-Speakerphone External
SF-1156V/R21 56k Data-Fax-Speakerphone External
SF-1156V/R21D 56k Data-Fax-Speakerphone-TAM External
SF-1156V/R21P V.92 Data-Fax-Speakerphone External
SF-1156V/RB 56k Data-Fax-Speakerphone USB
SF-1156V/RF1 56k Data-Fax-Speakerphone External
SF-1156V/T4 56k Data-Fax-Voice External
SFM-336ICL/AC 33.6K ISA
SM-24 Super Modem 2400 External
Super Modem 9600 External
TelePath Internet 56k LT Win Modem
TSF-1156V+/R21 56k Data-Fax-Speakerphone-TAM External
TSF-1156V/R21 56k Data-Fax-Speakerphone-TAM External
Unknown Ralink 11n Wireless LAN Card
Unknown Ralink 11n Wireless PCI Express Card LAN Adapter
Unknown V.92 MiniPCI Data-Fax (Dell Shinano)
V.32 9600 External
VF-1114V/C1 V.32bis Data-Fax External
VF-1128HV+/R9 V.34 Data-Fax-Voice ISA PnP
VF-1128HV/R9 V.34 Data-Fax ISA PnP
VF-1128V+/R6 V.34 Data-Fax-Voice External
VF-1128V/R6 V.34 Data-Fax-Voice External
VF-1133HV/R16 V.34 Data-Fax ISA
VF-1133PV/C1 V.34 Data-Fax PCMCIA
VF-1133V+/R6 33.6K Data-Fax-Voice External
VF-1133V/R16 V.34 Data-Fax External
VF-1133V/R6 Xlanbit 33.6K Data-Fax-Voice External
VF-1156HV/R19 56k Data-Fax-Speakerphone ISA PnP
VF-1156HV/R19-DL 56k Data-Fax-Speakerphone ISA PnP
XF-336SVL V.34 Data-Fax-Voice ISA PnP